Sailing: The art of getting wet and becoming ill while slowly going nowhere at great expense.

Sunday, December 30, 2012

Stove Top Stuffing


 I purchased a used galley stove that arrived this week.  A new to me, Origo 3000 alcohol stove arrived and caused me to think about how I would use it.  This would dictate how I install it.  I never plan on cooking while underway so gimbals would not be required.  The existing stove opening is very large for this unit. 


 I constructed a shelf for the stove that raises it up to a working level.  Under the shelf the supports split the area into two areas for plate, bowl and cup storage.  There is still a large area behind the stove to store bottles and extra Alcohol. The stove is attached to the shelf and there is enough room to open the top to fill the canisters.


 I took the time today to tidy up the wiring runs and make it look right.  The first mate helped by getting into the tighter areas.  They say that the wires should not be run in bundles like this as they can generate too much heat and do more damage if one burns up.  I hope that is in extreme cases only as I can see no other way to get these wires up to the control panel.

 I removed the shelf that I had installed previously so I could make a cut out for the garbage can.  Removal of the garbage can will give me access to the sink drain thru hull.

Thursday, December 27, 2012

100th Post


How to rebuild a sailboat in only 100 blog posts.  First; do not start to document the project until you are at least half way through.  Then continue at a random, ad-hock posting rate until you feel you might be posting too much.  Only then do you stand a chance of poorly documenting what has consumed the better part of three years of your life.  This post only goes to show how successful I have been in that endeavor.

I spent the week working on the trailer and getting ready for moving.  When, I don't know.  I removed the last of the plastic screen walls and cleaned up around the site.  I filled the trailer tires to 65 PSI and then lowered the trailer off it's blocks from the last 10 yrs.  Jacking up each corner and lowering for and aft until she sat just on four tires and the tongue.  The tires held.  That's a good start.


I hooked the trailer to the truck and connected the power cord.  Lights still worked.  Another positive. The big question was the brakes.  I put it in 4X4 Low and broke her loose from 10 years of standing still.  I pulled her out from under the cover about 2/3 of the way to taste the sunlight.  I could see I had a lot of tree trimming to do before she could get down the drive way.


I spent the rest of the day trimming trees as high as I could go.  There may be more near the end of the drive.  I am most concerned about the drive transition to the road.  It has worn down a lot over 10+ years.  I think the tongue will dig in.  I will try to move a lot of loose stone into the low area to raise it up.  I then tried to  roll her back.  The brakes had locked.  They broke loose after a lot of pressure and then seemed to roll free.  Maybe that is as bad as it will get.  Tires still holding air so dry rot does not seem to be an issue.

Wednesday, December 12, 2012

Graphics

I received and applied the graphics for the boat.  The NC registration numbers for both sides of the bow and the name for the stern.  No home port yet.  Still not sure where.  I did commit to the insurance company though.  It was difficult to find anyone interested in insuring a 1969 boat. 


The insurance quotes ranges from very low to very high with the biggest variable being where you planned on sailing.  So I hope to have a lower end cost in  a defined cruising area.  It did require a condition and valuation survey.  I had the surveyor out on Monday to provide the required report. 


Lets hope that works out to be a fair assessment of the quality and structural integrity.  Too busy right now to go look for marinas.  Maybe over the holidays.  2 addition stand up blocks have been ordered.  The next big thing is to get the trailer off it's blocks and the mast out of the basement. Once the trailer is movable I plan on pulling it out of the cover and then using the structure of the cover, along with block and tackle, to raise the mast up and then slide the boat back underneath.  On the inside I have just been cleaning up.  I did find a nice floor rug that fits.


Wednesday, December 5, 2012

Stand up Blocks

Some of the hardware that absolutely had to be replaced were the stand up blocks at the mast that turned the lines coming down the mast to the horizontal.  The main halyard, jib halyard, topping lift and spinnaker halyard.  They were old blocks.  Some were disintegrated completely, one was too small.  2 were serviceable but aged out.  I ordered 2 new ones from Garhauer.  The only problem is the base plate is a large circle vs a small diamond.  This is a problem because real estate at the mast base plate is limited.  I know they can even be mounted on the mast it's self but I wanted to keep it all on the same level.  
I removed a couple of the old blocks by drilling out the rivets from the top.  I could then pry off the plates and drill out the rest of the rivet down flush with the SS plate.  I made a paper template from the base of the mast to approximate how much room I would have.  Very Tight.  It will be a miracle if it all fits.  I had only planned on replacing the two primary halyard blocks and moving one of the serviceable ones over to replace the disintegrated one.

I mounted the two new ones with SS screws through the p;late and into the wood base through new holes drilled in the base plate.  I have decided to invest in the other two and will order those so it will all be done at once.  I also ordered all of the boat graphics and numbers.  I still need to shop for  boat insurance which is a tougher challenge than I thought as nobody wants to insure a 43 yr. old boat.

Monday, December 3, 2012

Bottom Paint


This weekend we had some unseasonably warm temps and that allowed me to jump on some bottom ant-fouling. I was able to get two coats on and paint under 4 of the 7 support pads.  When I launch depending on weather, I may be able to get a third coat but more importantly, coat under the remaining pads and the bottom of the keel that are just not accessible right now.


 The next week should also be nice so I may be able to get a few more outside things done.  I received the stand up blocks so I can mount those.  I only ordered 2 but really need 2 more.  I will wait and switch them out next year.  The other two are serviceable and on only on the topping lift and spinnaker halyard.  They either don't move much or not at all right now.


I also need to attach the dorade boxes and anchor chain stop.  I need one more clam vent for the interior.  I have to bolt up the water tank, which is still empty but we are getting ready to go.  Before and after photos are so rewarding.


Monday, November 26, 2012

Down to Decorating

So many things have been scratched off the list that the majority of what is left is cosmetic.  Yes I am at the point that she can be launched, floated and sailed if I choose to.  Safely I think.

I managed some tasks that have been undone for various reasons.  I finally connected the automatic bilge pump to the transom through hull and installed the inline vent break.  With the help of the Willing First Mate, who is still small enough to fit into the stern lazzerette and big enough to turn a wrench at the same time.  I installed new fuse holders on the bilge pump and wired (always hot) to the house batteries.  Connected the 3-way switch at the electrical panel and turned it on.  The sweet sound of pumping air emitted from the bilge.

I also took this time to clean up some of the wiring in the starboard lazzerette.  In this picture you can see the ACR feeding the large fused link to the house bank.  The charger feeding the charged to the house bank and the negative Buss. The small battery charger is a Guest Pro Charge 6 Amp.  Certainly small by any standard for a 200 Ah bank but I don't need a 6 hour recharge time.  If I plug it back in to shore power at all, it will be left for days or weeks before needed again.  It is much more of a trickle charger.  I was curious how this would react with the ACR and asked the Guest people who of course had no clue other than stating that the recharge time would be excessive with that small a charger for that large a bank.  I left it plugged in for two days.  For the first six hours it showed full charging.  For the next 24 hrs it showed trickle charge, and the next day showed full charge.  I am just not sure if it was for both battery banks.  A battery monitor would really help but in the end I don't really need to know because the battery switch combiner will work as long as one bank has charge in it to start the motor.  The 110 plug I was going to adapt to the existing 30 amp shore power plug.  I cut off the plug only to find a blue wire, brown wire and a yellow/green wire.  I am pretty sure which one is ground but not sure which is neutral or hot.  In the end I just used the housing and ran the 110 plug in there which is very secure and water proof.  I just need more butt connectors to seal up the joints.  There is no need for the the 30 Amp shore power as I have no 110 on the boat.


Two fire extinguishers were mounted on board.  One on the outside of the engine compartment and the second in the hanging locker in the forward cabin next to the galley.  Although only one is required for a vessel this size this give me better coverage at both exit points.  I hope I never need either.
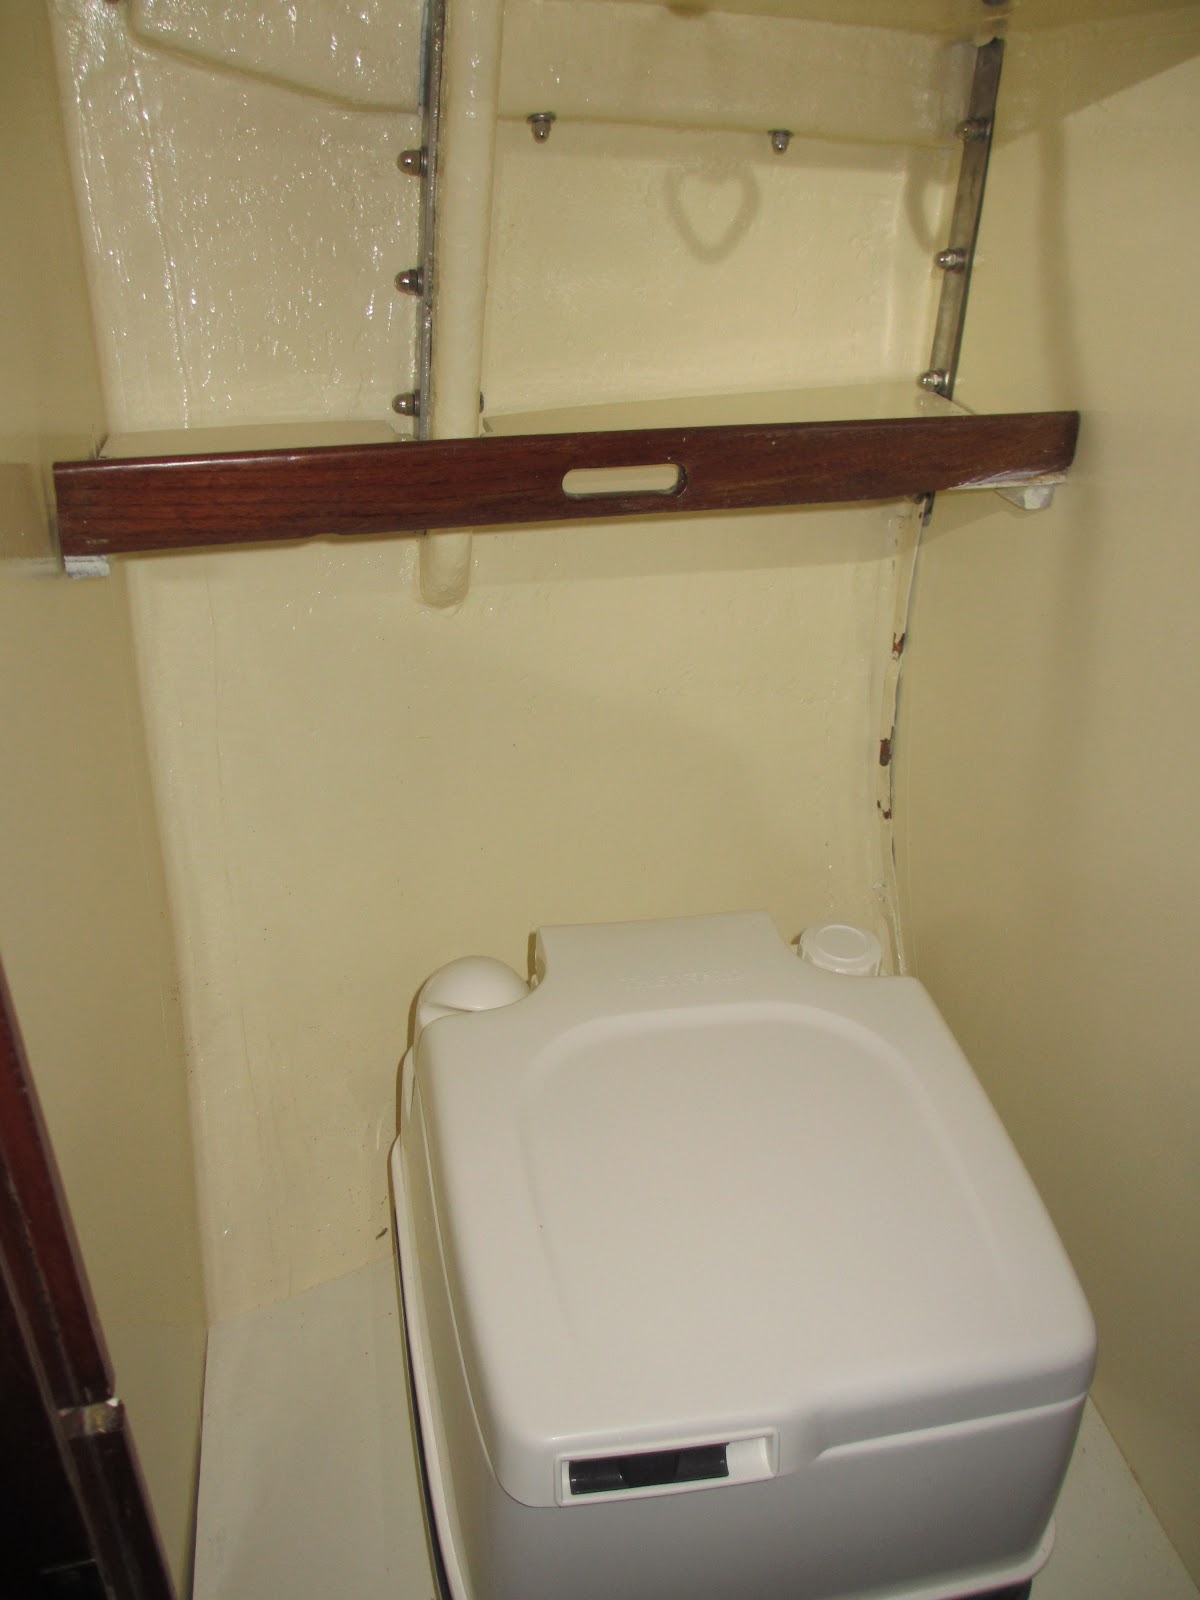
 I refinished and installed the old shelf from the head compartment.  I was not sure if there would be room because of the new configuration.  There is barely enough room to sit for a man and I was worried it would get even worse with the shelf.  Turns out the limiting factor is the cabin side and opening port more than the shelf.  Storage for essentials out weighed the inconvenience.
 

The best part of the day came in some decorating.  I cleaned up the two main cabin bulkheads and removed the builders plaque.  Here I mounted my parents two Chinese carvings of an old man and woman.  They are just a little too big for the space and dominate the cabin but still seem to fit right in.  Keeping up the tradition of combining the old with the new in this restoration.  I relocated the builders plaque to the forward cabin bulkhead that is furred out to the vertical but I am not sure why.  Turns out to be a good spot for mounting.


 I continued to work my way out of the cabin as I sanded and applied another coat of gloss spar varnish to the floor boards.  All of the other woods are a matte finish but the floor just seemed to scream out for gloss.  There will probably be a carpet runner over most of it so it should be alright and not too slippery.
 As I closed the door on the cabin I took time to install the lockable door latch.  At least it will keep the honest people honest.  Now I need to move on to more logistical problems.  Finding a marina, finding a window to bottom paint, finding an insurance co, ordering lettering, etc.


Outside Work

 This past weekend afforded some of the milder weather I needed for outside work.  On the agenda were hull prep, trailer and bottom anti fouling paint.  2 out of 3 ain't bad.  I managed to completely pressure wash the hull and all the old anti foul.  90% came off with just a pressure wash.  I worked on the patched through hulls which will require a little more sanding and then i can apply the bottom paint.  I did decide on the Micron CSC and should order this week.  Don't know when I will get it on pending a weather window.  I did read that the surface and outside temp must be above 50.  So that means two 60 degree days back to back.  That will be hard to come by.  I also learned that it does not need to be splashed directly after painting.  It can dry for a month or two and will reactivate when submerged with movement.

 I also cleaned off the trailer and replaced a broken tail light.  I rewired the trailer with a new plug and have all lights functioning on the trailer.  the only unknown is the brakes.  They may be frozen.  I will not know if they function until I can get a truck with a brake attachment and try them out.  I still have the trailer on blocks to keep pressure off the tires.  I will not remove that until the end as it helps stabilize the boat as I am on and off so much.  That will slow down over the couple of weeks so I might get her dropped down.

Tuesday, November 13, 2012

Loose Ends


Today was just finishing up some tasks left over from my productive day on the boat.  The big job was cleaning up all the tools and scraps and garbage that collects while working and vacuuming out all the sawdust, chips, etc.  Tools have a way of migrating from the shop to the boat but they never make it back to the shop.  So I emptied the boat of all tools.  They will probably all be back with in two weeks.

Then I opened up the screw holes for the hand holds that were covered up by the new trim.  I was then able to mark where to trim and notch the hand holds.  I notched them using the table saw and then installed them back over the trim.
  I re-glued the two trim pieces along the hanging locker top.  I spent years saving the special curved trim piece so I could re-glue it when the time came.  The time has come and I can not find it anywhere.  I have the two straight pieces but the special radius piece is missing.  I may have to recreate this now.  Very Frustrating.

And finally after 6 months of trying not to bang the doors on the new paint when I open them up I have bumpers.  I could not find them for sale anywhere so I made some out of rubber stoppers and counter sunk a hole, added the screw and washer and trimmed to length.  Not pretty but pretty functional.

Monday, November 12, 2012

Time to Fiddle

I had six straight hours on the boat this past weekend so I was able to get lots of things completed.  The additional NMEA 2000 T-connector that I ordered cam in so I was able to make the final connection on the backbone.  So I have the sensor going to the backbone, the digital readout going to the backbone and power going to the back bone.  There is also power from the Garmin GMI-10 directly as well.  The newer models take their power over the backbone.  I have an older refurbished unit but it was $140 less than new with the same warranty and works fine.  Now I will be able to see the speed and depth when we launch.
 I bed the final cleats and chocks on the stern.  The cleats were set with butyle in through deck potted holes with backing plates.  The chocks were screwed to the wood stern rail with SB screws and a bed of life caulk.  I also re-beded the 4 wood cleats that I had previously installed with butyl using the life caulk.  I think the caulk will work better on a wood to wood joint than the butyl that will never set up.  I also set the the new 1 " rope deck pipe in the stern.  My new emergency stern anchor will be set on the rail and the all rope rode will reside in the stern locker.
 Moving inside I finished the forward anchor locker cover and installed it.  One side is just varnished and the other is painted with dry-erase paint per my daughters request.  It actually works, it just looks a little odd being stark white.  While I was up in the for-peak I also connected the previously run electrical wires for the forward navigation lights.


 Inside the main cabin the big job was to make up the cabin side trims and install them on both sides.  I had some pre-finished dark cherry flat stock with a radius end.  I cut them into roughly 8' sections and pre-drilled and countersunk for a #6 screw every 6 inches.  One piece went on the vertical and matted up to another piece on the horizontal underside of the cabin side.  This way I was able to follow the curved contour and math the radius to the flat and make a finished looking corner bead on a curved surface.  The ends of each piece had to be notched around existing trim but they were all straight cuts. The horizontal underside piece I also set in Lifecaulk ( poly-sulphide) to help it hold in place and fill the voids. The last thing I have to do now is reinstall the two cabin hand holds I removed.  I will need to notch these to fit over the trim It came out looking very good even though my last count has 6 different woods and finished in the cabin.
I reinstalled the supports that hold up the fold away table.  The tape marks were I need to attach the hand holds again.  The trim looks neat and tidy.  The table mounts that I made out of the old chain-plate trim rings work just fine attached to the engine enclosure and the table can now be set up securely in the cabin.  I have always thought this was a hoaky arrangement but will suffice for now.  It is almost impossible to enter or exit the cabin with the table in place.  I did check and it will support my weight in an emergency exit but is not ideal.  I will look into also making a board to install the same table in the cockpit.  It will be much more functional there while at anchor.  In the end it is really only a two person boat and not much entertaining will be done so not much lost.


Monday, November 5, 2012

Interior Varnish

Finished up some small piece varnish in the basement this weekend.  Finalized the chain locker cover which is a trapezoid piece of plywood that is stained on one side and has dry erase paint on the other.  It can be inserted either way depending on need.  I also removed the mounting brackets for a couple of coats of varnish.  The cabin table was also cleaned up and sanded lightly with a coat of varnish.  

I did get on the boat long enough to drill a couple of holes in the engine compartment to run the tri sensor cable through and around to where the NMEA 2000 backbone is located.  I have ordered the other tridate connector and when that come sin make the final connections.


I drilled and potted the holes fro the two rear cleats that mount on to the transom deck and the holes fro the stern anchor rope deck pipe.  I should be able to mount all of those this week.