Sailing: The art of getting wet and becoming ill while slowly going nowhere at great expense.

Monday, December 12, 2011

Chain Plates


After too much time away from the boat which included a great trip to China, I was able to steal some time away from the Nutcracker performances to get some work done on the boat.  The two new chain plates I had made were ready for pick-up.  I had a little massacring to do but they looked good.  I first reinstalled the 3 on the port side which went fairly smooth.  The deck opening is enlarged enough that there should be ample room for butyl to be packed in there.  Without the teak decking and the teak riser pad there seems to be a lot of the chain plates exposed above the deck.  I have gone back and forth as to creating new risers but they would strictly be aesthetic only and would serve little purpose.  I did clean up all of the chain plate covers but soon realized that they too had suffered some corrosion and were rough at best.  I installed the chain plates with new bolts and acorn caps for a finished look.  I omitted the loc-tite so will be going back over it again.


I purchased another sheet of marine grade plywood.  1/2" thick this time for some additional supports, shelving and flooring installs.  I cut out all of the parts using the old ones as patterns.  The new one I needed was a raised floor for the new porta-potti to give adequate clearance.  This is now roughed out and will require finishing and a final install.  The porta-potti will be bracketed to this base and at the new hieght I will probably not reinstall the shelve I removed to give the user better head clearance. This also allows better access to the chain plates for inspection, etc.


I also stripped the forward hatch of the old finish and the old smoked plexi.  I have cut a new piece of clear Lexan that I will install to allow more light forward.  I will fashion a shade for use when the boat is not in use.  I also stripped and sanded the door that will be the new electrical panel door.  Both are reading for varnish again.

Wednesday, November 16, 2011

Electrical Cabinet


 I finished the new electrical cabinet yesterday and installed (temporarily) the door with paper cut outs of the controls.  The door has been salvaged from the old ice box that was torn out along with the entire starboard side bulkheads and engine compartment.

   Just in time as the primary switch/circuit breaker panel arrived.  I still need to refinish the door but the mock up lets me know it will all fit and clear.  It will be easier to access the wiring as the door swings open 90 degrees out of the way.  I am still playing around with the placements of each control and trying to leave room for future additions.


 My big question now is concern over the distance from the battery bank.  The main wires from the batteries to the switch will be 12 foot.  The batteries are close to the motor and the charging sources (alternator and solar panels).  The electrical panel is mid ships on the starboard side over what will become my navigation table.  Voltage drop can be accommodated but i wonder if there is something else I am missing.

Monday, November 7, 2011

Wood Work

This past weekend I reinserted the water tank in the under the forpeak birth.  I painted the lower half of the tank with 2 coats of the white epoxy paint.  My fill/pressure test of the tank showed a possibility of some moisture collecting around one of the lower welded seams.  It was not that much at all and I couldn't really determine if it was condensation or even dew from conducting the test outside.  So a couple coats of epoxy might be enough to extend the life of the stainless steel tank. A replacement tank (plastic) would be $300+ and a SS replacement would be $500+.  Since it will be used for washing water and flushing water only I am not too concerned.  Drinking water will be 3gal portable jugs for now. I have also decided that the best way to hold the tank down is a strap on the forward end with the rear end retained under a cleat.  Straps seem to be the popular method and are easy to replace.  I covered up the forpeak and placed the cushions on top.  Saturday night Lillian and I spent the night on the boat.  She thought it was great fun.  The forpeak is definitely her size.

I also made the cover for the chain locker.  A triangular piece of 3/8" ply set in teak cleats.  The cleats were made from blocking that was removed from the original ice box door.  There was a raised panel on the rear of the door that held an inch of insulation behind a fiberglass pan.  The cleats were the blocking for the pan.  I also saved the pan and will clean it up and use it for a serving tray (inverted) on the boat.  I need to varnish the cleats and paint the board.  Lillian has requested that one side be painted to be used as a marker board.  They have the paint available for that now.


I have also re-purposed the ice box door.  It will become the face of my new electrical controls cabinet.  I made a back panel out of the same 3/8 ply (to be painted) and fashioned the box that the door will mount to.  This will allow easy, hinged access to the wiring and again has saved a piece of the original construction.  The pictures show the door before demolition and mocked up with the panel.  I ordered the electrical switch/panel as the first piece.  I will order an illuminated navigation light switch, un-switched bilge pump controls and a 12v outlet (lighter socket) to round out the controls.  110v power and addition DC circuits will wait until we see what our usage is like.  Trying to keep it simple with battery charging accomplished with engine alternator and solar panels.  No need for 110v if we will be on a mooring.

Monday, October 24, 2011

A Little Trim


I took a leap of faith this weekend and started to put some things back on the boat.  All of the forpeak and cabin painting is complete other than one more coat in the hanging locker and some touch up in the head.  I installed the teak trim slats in the forpeak on either side of the cabin and all of the support boards.  (Before and after photo)  All of these had been refinished at some point prior to this last two years of steady work and had been sitting in the basement.  I reattached the slats with 1" silicon bronze flat head screws with a finish washer under each.  I have stripped all the paint of the water tank which goes underneath the forpeak birth and I also pressure washed the inside this weekend along with the Diesel tank.  I am now pressure testing the water tank by leaving it on the back deck filled to the brim to see if there is any leakage.  I have ordered and received the new galley foot pump (Whale Gusher Mk3) and if the pressure test goes OK I can begin reinstalling the tank and installing the plumbing for the fresh water system to the Galley sink.  Still need to buy hoses, clamps etc but wanted to get the equipment installed first to measure for length. 


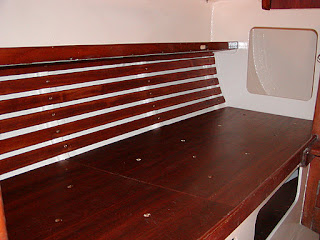
The Starboard settee is also all back together with boards and slats installed.  (Before and after photo)The port Settee needs a board trimmed and the slats refinished before I install but that should not be far behind.  I took all of the shelves and storage bottoms out and cleaned and repainted them this weekend with a coat of epoxy paint.  I will install all of those this week as well as the drawers and sliding cupboards.  All of that trim work needs a light sanding and coat or two of varnish but I should be able to do that in place.  Next week I will be moving on to the Cockpit lockers and the rear of the engine compartment.  All of this needs to be cleaned and scraped and painted.  The port side locker used to hold the diesel fuel tank and will need a lot of rework to reinstall it.  the starboard side still holds the batteries, starter etc and also has the bilge outlets.  The stern locker really only has the engine exhaust port.  Until I start scraping and sanding I won't know how much work will be involved and how much rework will be required.  While I have a month of above freezing temps I will try to knock this out.  Then when it is too cold for epoxy or painting work I can move back inside for electrical and mechanical installations.

Thursday, October 20, 2011

More Paint


I never would have imagined that this little boat could consume so much paint.  I am wrapping up the interior cabin painting and have gone through two gallons of epoxy paint and 3 quarts of enamel.  I am just about done and have one more round of enamel on the lower settees and another coat of epoxy paint in the hanging locker.  I will need another gallon for the cockpit lockers and engine compartment.  $230 in paint so far and another $100 to go not to mention the rollers, brushes and tape.  Add another $50.  Call it $400 for the interior paint jobs in material which is offset by the low cost of the labor.  The other bonus is I now know every square inch of my vessel intimately.

Tuesday, October 11, 2011

Fresh Paint


A large push on the painting as allowed me to finish up 90% of the primer.  I still have some cut in work to do and a lot of 2nd coat under settees and in cupboards that will not be getting a topcoat of Yacht enamel.
 This week I plan on only being able to paint on Wed or Thursday so progress will be minimal but I hope to get the coach roof done with two coats of yacht enamel so I can remove a lot of the tape and paper and focus on the lower surfaces.
 This epoxy paint is a pain to work with and really smells bad making it a chore in the tight quarters you have to get into but it finishes up nice, really fills in some voids and seems to be really tough and durable.  Itr ios so nice to go on the boat and smell fresh paint instead of rotting wood and diesel oil.

In the forpeak I was able to get all the deck flange bolts cleaned off and fitted with new washers and new acorn nuts for a finished look.  It doesn't look to bad for being 40+ years old.

Monday, October 10, 2011

Cart before the Horse


I have done it again. Lined up another project before the first one is done but timing is everything. I stumbled across an unfinished tender for sale that had some nice classic lines and would be a perfect match for the classic sailboat that əkwâr`ēəs is. The problem: it is still unfinished although the tough part of the job is completed the time consuming part is yet to be done. She is fashioned after an older style pram with beautiful mahogany accents on okoume plywood over a frame of steam bent white oak. It is held together with silicon bronze screws and 5200 adhesive. What it needs now is filling and fairing of all the screw holes. The main hull to be painted inside and out. All of the mahogany to be pulled and varnished and the final seats to be fitted and varnished. Along with lots of other little things to make it stand out; sanding, easing, oar locks, oars, cleats, etc. It is a fraction larger than I would like. She is just under 8' but closer to 7' at the water line and a high free board. She is wide, very wide; 52"wide. That is the most troubling for storage especially upended on the bow but will make for a very stable row boat. Hopefully I get a break over Christmas and can get the main body painted then just varnish the smaller parts in the basement. Why are some boats so pretty?

Monday, October 3, 2011

Prime the Pump


After many false starts and lots of sanding and cleaning I was able to begin masking and taping off for some paint applications. I ordered another gallon of the epoxy primer and two more quarts for the Yacht Enamel. The priming will continue through out this week. I may do the final coats on the cabin ceiling so I can peel off some of the masking a little sooner to let in more natural light. Getting into and cutting in all the details in the cabinets takes a lot of time. I have to break it into smaller sections but there are lots of start and stop opportunities. Crawling into lockers and cabinets with wet paint is a messy job. I end up wearing a lot of paint. All of the lockers, cabinet under-berths and drawer/storage interiors will remain the white semi-gloss of the epoxy primer. The ceiling and all settee backs, shelves, etc will get 2 coats of the Yacht Enamel. The weather is great for painting right now. Mid 70's during the day and around 50 at night. This will only last a couple of weeks so I am trying to make hay. It helps that Lillian has found a new place to do Homework, keeping dad company. Lillian has been given the entire forpeak cabin as her "room" on the boat. She is enjoying coming up with ideas on how she wants it decorated.

Monday, September 26, 2011

Progress


A good 6 hrs spent working on the boat in 2 hr blocks. No major visible progress but proceeding to the first coat of primer paint. I remade and reinstalled all of the support braces that were removed/rotted off the bulkheads that were replaced. They support the starboard settee, the port side and starboard side shelves, the galley cupboard shelf and sink shelf and the upper cupboard shelf with a new trash bin installed. There are two more cleats I would like to make and install to reinforce that upper cupboard shelf as I modified that area quite a bit. I need all of this in place before I put on the first coat of epoxy primer. I have two other areas I plan to build up but I will do these after the priming/painting. One is the head shelf and enclosure. I need to raise the level for the new porta potti and this may or may not alter where that shelf goes. The second is my new electrical control box. I still have to make the front face and install. Leaving both of these off will also help me gain better access to reinstall/rebed the chain-plates after painting.

I re-attached the copper grounding straps that were removed for bulkhead replacement. They have 30 yrs of paint on them that came off in most areas but I assume won't harm their intended porpose as long as the connections are good and clean and plan on painting them again. They attach to the middle shroud (upper) on either side. I never did find any termination point to check for connectivity. Both sides dissapear into the cement encased ballast. Proper lightening grounding is something I am not completely sure of other than you want a direct path from the top of the mast to the bottom of the keel. It appears I have that and the fact that the boat hasn't exploded in the last 42 years gives me some comfort.

The rest of the time was spent patching holes and areas needing fillets and sanding the entire cabin top getting ready for paint and another thorough vacuum of the cabin. This week I will wash down all the surfaces and begin tape off of the wood work. Try to get a coat of primer on this weekend.
Finally, you may have noticed my running miles have dropped off the chart. I have given in to the Achilles tendonitis and will admit defeat. I will not run again until mid October, giving myself a full 30 days off. Lots of spinning to keep the cardio up but it is not the same.

Friday, September 23, 2011

Back Order


Not the plan, just the parts. I have had great luck with ordering parts and pieces for the boat. All my orders have been from the mainstay of boat refurbishing vendors: Defender, Jamestown Distributers, McMaster Carr and even West Marine. This past week I expanded my searches which introduced 3 new vendors to my list in the hopes of lowering costs even more. The results were as the title of this entry. To be fair one did actually ship and was damaged in transit. Two new quarts of Interlux Yacht Enamel are spread over the inside of a big brown truck somewhere making the only big brown truck they have that has a Hatteras Off white interior. So to be fair, Boatersland Marine, did come through. Lets see how long it takes for them to re-ship. This is the first thing I have had damaged by UPS in my life, so we can let them slide too.

I ordered the thruhull transducer from Amazon. Seems like an odd place but their price was $30 less than any other source. This might turnout to be one of those "too good to be true" deals. They have yet to ship and keep pushing back the delivery date on the website. I will give them another week. No pressing need for the transducer but I would like to verify size before drilling the hole. I did epoxy in a blank backing plate and the instructions do say a standard 2"hole but I would like to be sure. It is a intelliducer that has 3 sensors in one thru hull, speed, depth and temp. I don't really need the temp but really wanted one hole and not two. It is NEMA 2000 ready and will connect to a future purchase of a Garmin chartplotter and possibly a Garmin GMI 10 panel.

The other back-ordered items were all the chain plate covers for the deck from Fisheries Supply. Again no great need as I need to finish painting the inside cabin before installing and I won't have any paint until UPS is finished repainting their fleet of trucks. I am having the two chain plates that were heavily corroded remade as well. Something I could have done myself with a lot of effort but a friend is charging me material only so it is a great deal. So this weekend will be lots of final prepping and painting hopefully with the one thing that did arrive; a new gallon of DP235 epoxy paint.
Also, finally found an image of what my table is supposed to mount to. I have the table, intact and in good shape but no clue where to mount it. Now I just have to find some brackets that will work on the engine compartment; hopefully from McMaster Carr!

Wednesday, September 21, 2011

Epoxy Paint


Very stout stuff! I had never used this before but in looking around for what to prime the insides of the boat with I came across an article where somebody had used it. It is the epitome of the belts and suspenders approach, at least when it comes to priming. I am starting at the forpeak and working towards the rear. I needed paint for what was to be visible, above the settees, ceiling, etc., and a paint for below but not in the bilge. Two coats of the Sherwin Williams DP235 epoxy paint, above and below has done the trick. Below it will be left in it's gloss white, easy to clean and very durable. Above it is then covered with two coats of Interlux premium Yacht Enamel in a Hatteras off white (cream color). So far it is coming out pretty well. I still have the head compartment and the hanging locker to do then I can close the door on the forpeak and finish a little patch sanding in the main cabin.

In between coats I also put on a couple coats of grey BilgeKote in the bilge areas up to the engine compartment. I ordered the last thru hull for the depth/speed/temp transducer that I need to install before the final painting in the cabin. There is still lots of little work in the cabin to do before final paint, attatching seat supports, some fillets, building a new electrical box enclosure, and now filling a small hole (rotten) in the starboard settee where it came in contact with the rotten engine compartment (already replaced).

Tuesday, September 13, 2011

Chainplates


Since everything else has been removed from the boat it was no big surprise that I now choose to remove all the chainplates. I had tried not to do this but i have come so far now to leave them in place would probably come back to bite me. They had obviously been a source of water leaks before so rebedding them would help that. Once removed I could properly clean them up as they had been painted over many times and one was even encased in fiberglass. I widened the top deck fiberglass (all new and painted) with a dremel to allow for removal. Unbolted they removed quite easily with a little hammer persuasion. I was surprised to find that two of the stainless steel plates showed signs of corrosion (heavy pitting) right where they penetrated the deck. This would have been below the teak decking but just above the fiberglass. I have no choice but to replace them so I will have to fashion the replacements from some 1/4" stainless stock. Luckily I can use the old ones as templates.

Tuesday, August 16, 2011

Roller Mount


Enough coats of varnish for the bow roller platform and all the other pieces I was varnishing at the same time. Now to put some holes in this piece of wood. First I made the 3 holes that would act as the primary bolt holes through the platform and the deck. From there I was able to mark the deck where I would need to drill. The holes through the deck were drilled out at 5/8" then filled with thickened epoxy. These I let sit for a day then drilled them out again with a 3/8" hole. This will seal the deck core should any water infiltrate the hole. The bolts for the primary holes are 3/8" stainless hex head 6 1/2" long. They protrude below deck about 1 inch. My next trick will be to make a backing plate to sandwich the deck and platform. I will use the 1/4" aluminum plate again but access to this point of the deck and hull is extremely tight and is blocked by the Sampson post running vertically up through the deck in the middle of the for-peak.Now for the rest of the holes. All of the rollers are attached with 3/8" SS bolts finished off with an acorn hex nut. These are all through bolted in the 2" wood platform. There are two other holes that will go through the plat form into the toe rail but will have 3/8" SS lag bolts instead. The finish appearance will be the same. My biggest concern is that the overhang may be too great. It looks really cantilevered out there. This is really only for launching, retrieving and storing the ground tackle. When the tackle is set, the rode will be run through the deck chock and onto the Sampson post so there should be no torque on the platform. Time will tell. This is the configuration for the Danforth and Claw. If I switch one out to a CQR I might be able to slide the rollers back a few inches. I just dont have $750 for a new anchor now. Sailcare did my sails way to fast so I have alot of money tied up in 3 sails that will sit on the shelf for a year.

Monday, August 1, 2011

Bightwork


Before the new bow roller platform can be mounted I needed to finish it off with varnish. I had some other items I had stripped and sanded ready for varnish so it was worth while to do them all at the same time. The two dorade boxes and lids, two winch mounts and a stern light mount. In the picture you can see the Sapele and Teak are not that for off in color, only in grain.

I continued with the same formula that has served me well on the toe rails and mast restoration. The first coat is an Epifanes Rapid Coat with a teak tint, light sanding then 5-7 coats of Epifanes Woodfinish Clear Gloss Varnish. This has worked out well timing wise because it is still too hot to spend more than 30 min on the boat at a time. I did have enough time this past weekend to template and cut out a new galley bulkhead skin (1/8") and will sand on it a bit more before applying. Working out the clamping and installation took longer than making the piece fit.

Friday, July 29, 2011

Bits and Pieces


This week was lots of work in the shop fixing, making and tweaking. I rebuilt the Whale Gusher manual pump. I can't imagine it was original but it easily was 30 yrs old. Removed it and stripped it down then sand blasted the aluminum casing. A new coat of paint inside and out, a rebuild kit with new flappers and diaphragm. Even made a new handle top out of a golf ball. Pictures showing before, after and the rebuild kit. It was previously installed in the Starboard cockpit lazarette. I don't think this is a good location. I wouldn't want to be pumping out with the entire lazarette open to the elements. It is recommended that a manual pump be located below where you can close the hatch and pump her out. I think it's new location will be on the new engine compartment side wall on the starboard side, through the open bulkhead. This way it won't be visable all the time and you will be able to sit on the berth and pump.

Got to work on the new mounting and backing plates for the lifeline stanchions. Previously they were mounted on a teak base on top of the teak deck. Both of which are gone now, a piece is in the picture below on the far left as a comparison. Overall thickness was about 3/4", 3/8" for the base and 3/8" for the teak deck. The new polypropylene thermoplastic composite bases I made from scrape race car splitters and are 1/2" thick. These will be painted the same color as the deck. The backing plates are 1/4" aluminum. There were no backing plates prior so this will be an improvement.

There was some final tweaking of the roller platform and placement of the rollers. Now it is time for varnish then mounting. Still mid to upper 90's so I'm staying off the boat and in the basement work shop.