I had six straight hours on the boat this past weekend so I was able to get lots of things completed. The additional NMEA 2000 T-connector that I ordered cam in so I was able to make the final connection on the backbone. So I have the sensor going to the backbone, the digital readout going to the backbone and power going to the back bone. There is also power from the Garmin GMI-10 directly as well. The newer models take their power over the backbone. I have an older refurbished unit but it was $140 less than new with the same warranty and works fine. Now I will be able to see the speed and depth when we launch.

I bed the final cleats and chocks on the stern. The cleats were set with butyle in through deck potted holes with backing plates. The chocks were screwed to the wood stern rail with SB screws and a bed of life caulk. I also re-beded the 4 wood cleats that I had previously installed with butyl using the life caulk. I think the caulk will work better on a wood to wood joint than the butyl that will never set up. I also set the the new 1 " rope deck pipe in the stern. My new emergency stern anchor will be set on the rail and the all rope rode will reside in the stern locker.
Moving inside I finished the forward anchor locker cover and installed it. One side is just varnished and the other is painted with dry-erase paint per my daughters request. It actually works, it just looks a little odd being stark white. While I was up in the for-peak I also connected the previously run electrical wires for the forward navigation lights.


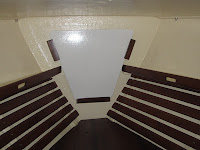
Inside the main cabin the big job was to make up the cabin side trims and install them on both sides. I had some pre-finished dark cherry flat stock with a radius end. I cut them into roughly 8' sections and pre-drilled and countersunk for a #6 screw every 6 inches. One piece went on the vertical and matted up to another piece on the horizontal underside of the cabin side. This way I was able to follow the curved contour and math the radius to the flat and make a finished looking corner bead on a curved surface. The ends of each piece had to be notched around existing trim but they were all straight cuts. The horizontal underside piece I also set in Lifecaulk ( poly-sulphide) to help it hold in place and fill the voids. The last thing I have to do now is reinstall the two cabin hand holds I removed. I will need to notch these to fit over the trim It came out looking very good even though my last count has 6 different woods and finished in the cabin.

I reinstalled the supports that hold up the fold away table. The tape marks were I need to attach the hand holds again. The trim looks neat and tidy. The table mounts that I made out of the old chain-plate trim rings work just fine attached to the engine enclosure and the table can now be set up securely in the cabin. I have always thought this was a hoaky arrangement but will suffice for now. It is almost impossible to enter or exit the cabin with the table in place. I did check and it will support my weight in an emergency exit but is not ideal. I will look into also making a board to install the same table in the cockpit. It will be much more functional there while at anchor. In the end it is really only a two person boat and not much entertaining will be done so not much lost.


 Moving inside I finished the forward anchor locker cover and installed it. One side is just varnished and the other is painted with dry-erase paint per my daughters request. It actually works, it just looks a little odd being stark white. While I was up in the for-peak I also connected the previously run electrical wires for the forward navigation lights.

 Inside the main cabin the big job was to make up the cabin side trims and install them on both sides. I had some pre-finished dark cherry flat stock with a radius end. I cut them into roughly 8' sections and pre-drilled and countersunk for a #6 screw every 6 inches. One piece went on the vertical and matted up to another piece on the horizontal underside of the cabin side. This way I was able to follow the curved contour and math the radius to the flat and make a finished looking corner bead on a curved surface. The ends of each piece had to be notched around existing trim but they were all straight cuts. The horizontal underside piece I also set in Lifecaulk ( poly-sulphide) to help it hold in place and fill the voids. The last thing I have to do now is reinstall the two cabin hand holds I removed. I will need to notch these to fit over the trim It came out looking very good even though my last count has 6 different woods and finished in the cabin.
 I reinstalled the supports that hold up the fold away table. The tape marks were I need to attach the hand holds again. The trim looks neat and tidy. The table mounts that I made out of the old chain-plate trim rings work just fine attached to the engine enclosure and the table can now be set up securely in the cabin. I have always thought this was a hoaky arrangement but will suffice for now. It is almost impossible to enter or exit the cabin with the table in place. I did check and it will support my weight in an emergency exit but is not ideal. I will look into also making a board to install the same table in the cockpit. It will be much more functional there while at anchor. In the end it is really only a two person boat and not much entertaining will be done so not much lost.
No comments:
Post a Comment