Sailing: The art of getting wet and becoming ill while slowly going nowhere at great expense.

Tuesday, October 30, 2012

Interior Finish


 I finished up all the fixed in place wood refinishing.  I still have some parts that are/were removed to be refinished in the basement.  And finally I have new trim that will need to be installed along the edges of some old and new finishes to bridge the gap. 


I installed the Garmin GMI10 unit in the old hole for the tachometer (non-functioning) and will do all the wiring next week if time permits.  I installed the new Bora fan on one of the new bulkheads.  I have a cheap oscillating fan that i may install in the forward cabin. 

I made two new cover plates that I used to cover the old holes from the 120v outlets the PO had installed.  I don't plan on any AC system so I blanked them off.  One was in the cabinet/nav table enclosure and the other was in the engine compartment wall of all places.  The disconnect box was actually mounted in the engine compartment. 

 I fixed the loose reading light at the companion way.  I took out the bulb, turned the unit upside down and sealed off the opening with butyl tape and filled the interior cavity with neat epoxy.  Solid as a rock now.  I still would love to get some real lights but they are not on the necessary budget list right now

 Although all of the interior finishes look abysmal in these photos, it doesn't look half bad in person.  The differences in color and sheen are not all that distracting.  Once I refinish all the other teak fixtures that went on the walls and reinstall those the starkness may go away and help blend.


Wednesday, October 24, 2012

Running Rigging


More stuff.  More Money.  I have put off these purchases as long as necessary.  I got another coat of varnish on a sanded interior this week.  One more should do it.  I have a lot of other small bits and pieces to varnish but they are all in the basement and can be done any time.

My package came from Defender right on time.  2 new wire to rope halyard kits, 2 new halyards with shackles, 1 new Life Sling and 1 new anchor lock.  The Wire to rope kits are comprised of 50' of 3/16 SS wire cable pre-spliced to 50' of 7/16 line.  The only assembly I had to do was determine the correct length of the cable, cut and crimp on the end.  I layed the old Jib halyard (wire) on the ground next to the new one and cut accordingly.  The wire is crimped via an oval barrel swage sleeve and a SS thimble to make the eye after the cable has been run through the sheave.  Same operation for the Main Halyard.

The rest of the line I left intact and will trim to length once the mast is stepped and I can measure properly.  The other two halyards are 3/8' line with snap shackles.  One for the topping lift and one for the spinnaker (drifter) of the future.  There is also a spinnaker pole guy that needs to be run but I will do that in my next purchase.  So I ran all these new lines and halyards on the mast and got one step closer to finishing.


The Life Sling is a required piece of safety equipment and get hung on the stern rail.  I also ordered the Garmin GMI10 instrument display that I will hook up to the already installed tri-ducer ( speed, depth, temp) sensor.

Wednesday, October 17, 2012

We Have Power

 We finally have independent power aboard!  As a reward for two weeks of sanding and 1 of the 2 coats of varnish put on, I opened up the check book and invested in the expensive part of the power plant.  For the house batteries, I have two 6 volt golf cart batteries (GC2-XHD-UTL) from Interstate.  Why did I choose these.  The industry benchmark seems to be Trojan Batteries; the T-105's to be specific.  They are some of the best performing and more expensive batteries you can find. The Interstate's are listed as a replacement for the T105's but on closer inspection actually have specs that are a tad bit better.

Comparing the total Amp Hr ratings, which is what we really need to look at for house batteries, the Trojans are at 225 Ah and the GC2's are at 232 Ah.  The reserve capacity at 25 amps is 447 vs 475 and at 75 amps is 115 vs 122.  Everything is just a bit higher on the GC2's, including the weight.  62lbs vs 67lbs.  You would expect more weight to come from heavier plates and that translates into better performance.  The second reason I went this way is that through work we get a discount at Interstate Battery.  So I ended up with slightly better performance and lower initial cost.  The only unknown is longevity.  We shall see.

In the photo you can see the two 6-volts wired together in their battery boxes mounted under the lazzerette on the starboard side.  The funny looking yellow cable with the blue tape is to identify the jumper cable from the neg. on one battery to the pos. on the other, combining them to be a 12-volt bank.  You can also see the 125A Mega Fuse on the positive side and the negative bus both mounted on the cockpit side wall support.  There is still some wire management I have to do to make it neater but we now have House Power!

The Starter Battery is under the port lazzerette and is a Group 27 Interstate Battery (SRM-27) loosely based on a Trojan SCS200 spec.  This time the Trojan has a much better product.  In CCA (cold cranking amps)  the Trojan is at 620 while the Interstate is at 600.  RC at 25 amps is 200 vs 160.  This concerns me less on this battery because I also have the battery switch that can combine both banks for starting if need be and a starter battery I expect to wear out faster than the house bank.  I may regret that decision but I did save a few dollars on this round.

Both banks are also connected to a ACR (Automatic Charge Regulator) which is mounted on the rear cockpit bulkhead.  Each connection from the bank runs through a 100 A Mega fuse and the ACR is grounded through a fused Neg wire back to the neg bus.  This will allow a charge source at one bank to spill over and charge the other bank.  More specifically when the engine is running and the alternator is putting juice back into the starter battery, the extra charge goes over to the house bank.  If there is an external charge source going to the house bank, shore power or solar power for example, then the extra charge goes over into the starter battery.
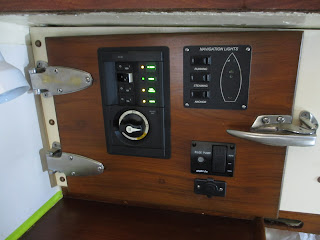
It was nice to turn on the battery switch and have power lights come on.  Hit the breakers and turn interior lights on.  I did also start the motor again with the new starter battery and it fired right up.  I was worried about it not starting as before and was really concerned I had an air leak in the fuel system.  In my reading online about this problem I learned that the Yanmar manual says to set the throttle to high when starting (without the prop engaged of course).  I had been starting the motor at idle.  Makes a big difference.

I am not overly thrilled with my choice of LED reading lights. You get what you pay for.  They are cheap but they do work, although the shades have all worked loose.  I plan on pouring in some epoxy at the base to permanently set the shade to the post.  I did get one coat of matte spar varnish on the interior wood work after all that sanding.  It needs a light sanding now and another coat.  I finished up the boom tip painting with the fourth coat and it has done what I wanted it to do.  Sealed the wood, finished the end and will give me a good visual when the boom swings over.


Monday, October 1, 2012

Sanding.....Again

I am well into the last round of sanding for a while.  A very long while I hope.  I am prepping all of the little wood trim in the cabin.  I plan on applying a couple coats of a matt finish poly-urethane as I think it looks better than all that gloss on interior wood work.  Unfortunately there is an awful lot of it.  Every window, every transition, all the galley fronts, the hanging locker door, the head door and frame, the nav table and locker.  That is really only half of it.  Not to mention the full engine compartment enclosure and steps.  It went on all weekend and I still am not complete.  But I am getting close.  This is not a strip down to bare wood sanding.  Just a clean up and scuff for new urethane sanding.  A lot of areas could have or should have been sanded back all to bare wood but that would set me back months.  It is time to go Sailing!!  Beautifully refinished teak inside the cabin will not make the boat anymore seaworthy; will not make it point higher or go faster.  Time to get in the water.

Monday, September 24, 2012

Woody Bits

 The weekend started out with a short list of things to accomplish.  Primarily finishing the attachment of the various parts from last weekend and all of the cleats and blocks.  I began by employing the Willing First mate (WFM) to ratchet on some nuts in the cabin while I held the bolt from the topside.  The rest of the day was spent on home projects that all consumed time but I did finish up the day back on the boat and sanded down the thru hull patches I had epoxied and 6 spots on the rudder that were ground, filled and sanded.  I also sanded down the last 10 inches of the boom where the varnish had failed; as this was the part of the boom that is outside the mainsail cover.  I applied a coat of varnish but the color will never match the amber hue of the rest of the boom.

I have now decided to paint this tip of the boom with the off white deck paint and actually make it contrast on purpose.  I have seen this done to the tips of masts on gaff rigged boats and I believe I have seen the tip of the booms done as well but can't be certain.  It could be considered a safety feature.  A streak of white that you see out of the corner of your eye before the swinging boom hits you up side the head on an unexpected jibe.

I assembled the blocks and cleats with butyl.  Not sure if that will work out the best.  As time goes on it works it's way out the sides and requires re-tightening of the screws.  As a matter of fact all of the hardware I have mounted in butyl has required re-tightening as it settles in.  Not sure if it is the heat just making the butyl relax more as there is no load on the hardware.  I test fitted and the gap under the block is much greater than under the winch pads.  I decided to make bases for the blocks out of the resin impregnated plastic board I have.  4 pads were made and all the edges eased over on the router table and sanded smooth.  They will remain unpainted as I am having a hard time getting paint to stick to this stuff.  It must take some special primer.  The other bases (stanchion) that I made from the same material and painted have all flaked off under the least amount of pressure.

The bases I screwed to the bottom of the blocks and got ready again for the install, first dry fitting everything.  Then I bedded these in 5200.  This stuff is messy to work with but is the absolute best for this kind of mounting.  I may re-bed the cleat, thus my choice to use butyl, but do not plan on re-bedding the block and base.  I do not want any water getting in and sitting between these two pieces of wood and rotting from the inside out.

Since I had the half used tube of 5200 out I also set the thru hull for the tri-data transducer in the hole that was already prepared in the spring.  The 5200 takes 3-7 days to really set up.  The rest of the day was spent cleaning out the boat to get ready for the sanding of all the interior wood that I did not remove.  I plan on spending 2 weeks doing this before I start to varnish the interior.  I have not spent any money on the boat after my blow out last month but it is getting close to shopping time again.  More hardware.


Tuesday, September 18, 2012

Remounting

This past weekend I continued the remounting of old and new hardware on the boat.  30 new holes were drilled, filled and tapped for the hardware.  I mounted the two new primary self tailing winches on their existing SS bases.  I made new pads to make up for the lack of teak decking removed.  I remounted the teak winch bases for the secondary winches (spinnaker) and then mounted the winches on the bases.  I remounted the two halyard winches, light duty aluminum Lewmar 7 winches on the cabin top.  I used the existing, reconditioned SS backing plates with new bolts and acorn nuts for a clean appearance inside the cabin.

I installed, almost, the two new rope clutches.  I made new backing plates out of aluminum but would like to find some SS to match the winch plates so I haven't tightened them down yet.  I installed the two line organizer that were existing and used the existing SS back plates (reconditioned).  I still have to tighten them down and need a second person for that.


I will wrap that up and continue on with the mounting of cleats and cleat bases (all wood).  These should have Silicone Bronze fasteners but I may just use SS which is more readily available.  I still need to attached the chain port on the bow. The hole is cut and sealed but I want to try and sand blast off the cheap chrome plating first.

The list gets a little shorter but is still impressive as to all the little things that have to get done.  I have started to make lists for the week as goals so as not to get bogged down in the size of the work left to do.  Just what I can accomplish this week.


Thursday, September 13, 2012

Internal Non-Combustion

This week I had scheduled to change the oil and oil filter in the Yanmar and change the oil in the gear case.  Proper procedure is to run the motor for a while to warm up the oils to make them easier to extract through the dip stick hole.  There is a drain plug at the bottom of the oil pan as one would expect but no one has ever been able to get to it with the motor installed and lived to tell about it.  The designer of this little system is the one that should have the title of Dip Stick.

With everything set up to go.  The bucket of cooling water filled, new oil, filter, rags etc.  I go to warm up the engine.  No Go.  It ran perfectly two weeks ago but I can not get it to fire this time.  I drain some of the fuel off at the fuel filter.  It is clear but smell very rubbery.   Hmm.... Could one of the fuel lines, that are actually used race car SS jacketed lines, be bad or inappropriate for diesel.  This would mean draining all 6 gallons and replacing all the lines and connectors.  Bad Deal.

I investigated the fuel lines over the next couple of days and found out they were fine for diesel.  Something else must be a miss.  I knew that it must either be bad fuel or air in the line for a diesel not to start.  The fuel seemed fine so it must be air in the line.  I attempted again and started to re-bleed the lines as before.  Everything had clear fuel at each bleed point until the final high pressure line.  Here I could get no fuel at all.  I took that line completely off and cranked over the motor from inside the cabin at the engine compartment by hitting the starter with a fully extended boat hook.  The RFM was not available and it is good to know I can do this if required out on the water single handed.  After a few starts I was getting fuel.  It seemed more like a blockage than air but it is hard to tell.  I tightened everything up and she started up fine.  The injector may need replacing at some point if this keeps up.


I let the motor run for 10 minutes and then sucked all the oil out and changed the filter with a minimum amount of spills and mess.  Restarted the motor and engaged the gear box as well to circulate all the new oil.  No leaks and everything ran fine.  My set up for running cooling water has worked perfectly and will be helpful in the future if I have to winterize with antifreeze.

In other news, I am finishing a pair of new oars in a mahogany stain with varnish for the dinghy.  I purchased leather oar wraps and stops to give them a more authentic look.  That project will fill some spare time over the next 10 days.